Table of Contents
Brewer Spectrometer Maintenance
* * Note this page is base off of the Canadian Brewer Spectrometer Network's (CBSN) Operator SOP which is Alert Global Atmosphere Watch (GAW) lab wiki document prepared by Kevin Rawling and Michael Brohart and how the CBSN operates their brewers * *
Principle of Operations
Brewer spectrophotometers track the Sun or Moon, and use a spectrometer combined with a photo-multiplier tube to take high-precision measurements of the intensity of ultraviolet light reaching the Earth’s surface. These measurements are taken at the absorption wavelengths of ozone, which allows the total amount of stratospheric ozone in a column between the instrument and the Sun to be calculated.
Measurements made at this station are part of a worldwide network of 200+ currently operational Brewers in 40 different countries. Alert is the northernmost location in this network, while the Amundsen-Scott station at the South Pole is the southernmost. The data from these instruments are collected and analyzed to create a model of the Earth’s stratospheric ozone cover.
Task List
| Checks | Frequency |
|---|---|
| Software check | Daily |
| Dome/Lens cleaning | Daily |
| Drive plate cleaning | Monthly/Bimonthly |
| Steps pre revolution check | After drive plate cleaning |
| Sun sighting | Twice monthly |
| Moon sighting (Polar Sites) | One Monthly - Moon ¾ full or more |
| Desiccant change | As required |
| Installing/removing winter covers | Before/after cold season if applicable |
Daily task
Dome/Lens cleaning
Tools and material required
- Methanol
- Kim wipes
- Nitrile Gloves
- Wear a glove to prevent methanol from contacting the skin.
- Re-use glove if completely intact
 | Methanol is toxic. Avoid inhaling and skin contact. Please wear nitrile gloves when using methanol to clean |
|---|
Procedure
- Visual inspection and cleaning of the dome and window should be done daily
- Remove any snow accumulation using a non-abrasive soft-bristled brush
- Moisten a Kimwipe with methanol and clean the Brewer dome and windows complete to their edges
- If there is any ice accumulated on the window/dome, that can easily be removed, gently do so. Ensure hard objects do not accidentally come in contact with the quartz glass. (e.g. rings worn on the hands). If the ice is firmly attached to the window/dome, apply a small amount of methanol directly to act as a deicer and allow the heater inside the Brewer will slowly melt the ice over time.
| Never chisel the ice off the dome or window! Since glass is not fully transparent to UV wavelengths, the domes and window are made from precision-machined fused silica (quartz) which makes them extremely expensive to replace! |
|---|
Software Check
- Check if the Julian day and time in the brewer software is correct

- If the Brewer software is more then five (5) seconds off, report it in the addition notes section of the log form and contact the Brewer Support.
- Update the time by performing the following
- In the brewer software window, press HOME to get into the main menu (This may take a few minutes depending on what the Brewer is currently doing.
- Once the software gets to the menu, type 'pdtdfrhphgcn' HOME. This will update the time, move the micrometer to the proper measuring positions and restart the schedule.
- if the dosbox is not responding, you can double click the dosbox icon to restart the dosbox. (Please note this in the logs if this was done)

- If the Brewer was not running a schedule, type “skc” Enter to display a list of available schedules for use. Record in the log form that the Brewer had been out of scheduled operation, for what purpose it was taken out of schedule and the time it was returned it to schedule. If the Brewer was running on a schedule, typing “cn” Enter will return it back into the schedule it was running.
- Inspect at the RH level and ensure that it is under 15%. (Note: The lettering will turn red once it hits 18% and above) The RH level may be artificially higher after a rainy/snowy day.
- If the Brewer is found to be out of scheduled operation and is on “menu”, type “recn”Enter to reset all motors and restart the schedule. Inform the Brewer network staff of the instrument interruption so they can further diagnose the cause.


Sighting
The Sun sightings need to be performed approximately every 2 weeks. If the operator’s schedule allows, the optimal time for a sighting is roughly half way to, or after solar noon. A good estimation would be 2-2.5 hours either side of solar noon. Often operators may not be on site during these hours. In these cases attempt a sighting at the best time the schedule will allow. When sighting on the Moon during the winter, it will be easiest to sight the instrument when the Moon is near ¾ or more illuminated and close to its upper transit. If a Moon sighting is being performed, most of the lights near the Brewer will need to be turned off to allow your eyes time to adjust and detect the dim light over the entrance slit.
- At the Brewer software prompt, type ‘si’ Enter for a Sun sighting, or ‘sim’ Enter for a Moon sighting.

- Proceed to the Brewer and remove the viewing window cover.
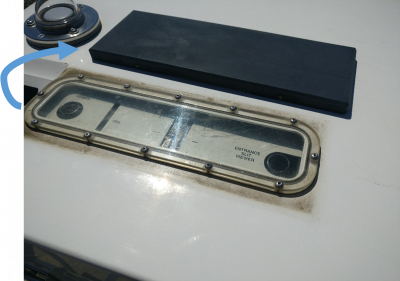
- Position yourself so that you do not block the light of the Sun or Moon from entering the aperture of the instrument (Light needs to enter at the slanted window and an operators shoulder can easily get in the way during sighting).
- Look into the ‘entrance slit viewer’ and use the four push buttons on the front of the Brewer to centre the Sun’s or Moon’s image across the entrance slit.
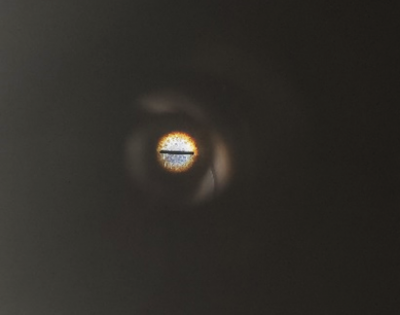
- Replace the viewing window cover and return to the Brewer computer.
- In the Brewer software, press CTRL+END to exit the sighting menu.
- If a statement in red comes up saying “The adjustments are unusually large. Do Not save unless absolutely certain” it may mean the instrument was mis-positioned before the sighting. Type N to keep the old values, then at the prompt type ‘tdazzesi’ ENTER (or for a Moon sighting ‘tdazze” ENTER then at the prompt type ‘sim’ENTER). This will ensure the correct time (td); set the azimuth reference position (az); set the zenith reference position (ze) and re-enter the sighting mode (si/sim). Redo steps 2-7. If the warning is still displayed after re-referencing the azimuth and zenith, contact the Brewer technician before proceeding.
- If the only the statement, “Do you want the values saved? (Y/N) is displayed, type Y to save the new values.
- Record the new sighting values from the Brewer window into the log form as shown below. Click yes for “Sighting” and enter the corresponding values.
- 10. Type ‘cn’ ENTER to re-enter and continue the schedule.


| Tip 1 | Tip 2 |
|---|---|
You should be able to do a sighting even if it is slightly overcast. As long as a shadow is cast by the Sun, you should be able to see the Sun’s disc on the instruments entrance slit. The default ND filter setting is normally adequate. However if the image seems too bright or too dim you can adjust the brightness of the image by changing the neutral density (ND) filter setting, This is done by pressing Z,X,C,V<key>,<key>b while in sighting mode. The lower the ND filter number, the brighter the image (use with thin cloud) and the higher the ND filter the dimmer the image.  | The sighting buttons move the Sun’s image in the entrance slit viewer as shown.  |
Drive Plate Cleaning
ools and material required
- Methanol
- Kim wipes
- Nitrile Gloves
- Wear a glove to prevent methanol from contacting the skin.
- Re-use glove if completely intact
| Methanol is toxic. Avoid inhaling and skin contact. Please wear nitrile gloves when using methanol to clean |
|---|
Procedure
- Press HOME in the Brewer software window to return to the command prompt.
- Proceed to the Brewer instrument and switch off the tracker using the power button located on the side of the Tracker (not Brewer).
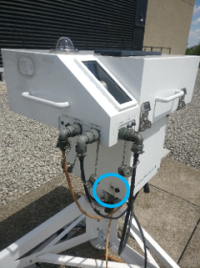
- Remove the transparent magnetic cover of the tracker.
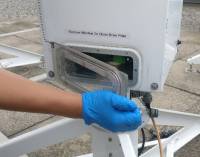
- Clean only the edge of the drive plate, using a Kimwipe with a modest amount of methanol. Avoid the top of the plate to ensure the Kimwipe does not accidentally catch and bend the reference flag. Rub the drive edge briskly while slowly turning (slow walking pace) the tracker through 360° of clockwise rotation to access the entire circumference of the plate.
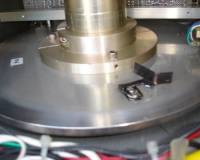
- After the plate is fully cleaned, inspect and clean the drive shaft where the shaft and plate meet. Also ensure the Kimwipe is not accidentally drawn under the drive shaft. This will press the fibers of the wipe onto the plate edge and leave a spot that the drive will slip on if not properly removed and re-cleaned.
- If excessive methanol is used or it is too cold for the methanol to evaporate quickly, the drive plate edge should be re-wiped with a dry portion of the Kimwipe after cleaning
- If any aluminum flakes are present on the drive shaft bearing, wipe clean; make an entry into the log form and inform the Brewer network staff.
- Replace the transparent tracker cover and ensure that it is properly sealed.
- Press the power button on the side of the tracker to turn it back on.
- Complete a Steps per Revolution
- Continue with a sighting or type ‘cn’ ENTER to re-enter and continue the schedule.


Steps Per Revolution
The steps per revolution check should ideally be done immediately after a drive plate cleaning. Ensure the methanol used in cleaning has completely dried from the plate or has been wiped with a dry Kimwipe after cleaning.
- Press HOME in the Brewer software window to return to the command prompt, if not already done during drive plate cleaning.
- Type ‘sr’ ENTER to determine the steps per revolution. (This will take some time.)
- Record the steps/rev value and date in the ‘Additional Notes’ section of the Log form.
- Press Y in the Brewer software window to save this new steps/rev value. If it differs by more five steps from the previous value, repeat steps 2 and 3.
- At this point a sighting should be performed. Proceed to the next section to perform the sighting or, if a sighting cannot be done, return the Brewer to its schedule by typing ‘cn’ ENTER to continue the schedule or ‘skc’ ENTER and enter in the desired schedule name excluding the extension.